Step-by-Step Baby Gate Installation on Tile, Concrete, and Banisters
By Mateo Silva • 22nd Oct
When your staircase meets tile flooring or concrete walls, baby gate installation on tile transforms from routine to high-stakes geometry. Forget generic advice, you need challenging surface gate mounting tactics that prevent wobble, protect surfaces, and satisfy safety inspectors. As a handyman who's mapped 300+ stairways, I've seen homeowners drill blindly into grout lines (hello, shattered tile) or mount gates on hollow drywall over concrete (a sagging disaster). A precise plan beats trial-and-error, measure flow, then mount once. Your stakes? A single misstep could mean a toddler tumble or a $500 tile repair. Let's convert your awkward staircase into a bombproof barrier.
Why Standard Gate Kits Fail on Irregular Surfaces
Most gates assume plumb walls, standard drywall, and parallel banisters. If you're deciding between mount types, start with our pressure vs hardware comparison for stair-safe choices. Reality? Concrete walls hide rebar 2" deep, tile grout lines shift under pressure, and banister angles often deviate by 5-10 degrees. Pressure-mount gates fail catastrophically on tile because:
- Grout isn't structural: Most tile grout lines are 1/8" wide, too narrow for standard wall cups to grip
- Tile flexes: Even 1/4" of tile movement over time loosens tension mounts
- Baseboard lip traps: 3/4"-tall baseboards create a 1/2" reveal gap where gates tilt forward
Hard-mount gates face different pitfalls on concrete: Tapcon anchors pull out if drilled into hollow sections, while masonry bits wander on slick tile surfaces. Banisters? Non-parallel posts leave gaps where gates swing into the stair nosing, a critical clearance error. Map, dry-fit, then drill isn't just my mantra, it's physics.
Tile Surface Protocol: The 3-Point Anchor System
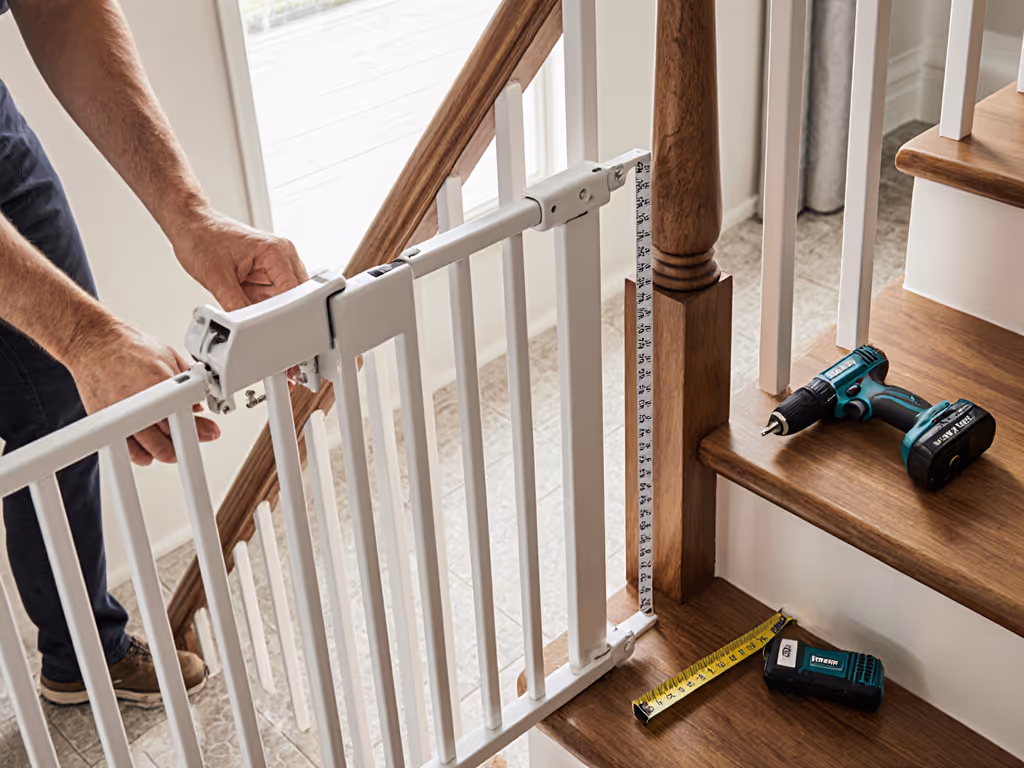
Step 1: Measure the True Mounting Plane
Tile installation often leaves walls 1/4" out of plumb. Use a 48" level to find high spots, then measure from the tile surface (not the wall) to your banister centerline. Required tools:
- 48" metal level
- Digital caliper (for reveal gaps)
- Laser measure (for baseboard lip height)
Note: If your baseboard lip exceeds 1/2", you'll need spacers (we'll address this later).
Step 2: Grout-Lock Drilling Technique
Concrete wall gate installation on tile demands avoiding grout lines. For wet rooms and narrow thresholds, see our tile kitchen gate guide for moisture-resistant options. Drill only into tile bodies using:
- Masking tape trick: Tape the tile first to prevent bit skating
- Diamond core bit: Start at 1/8" speed, increase gradually to 400 RPM
- Depth guard: Set to 1-1/2" (avoids cracking tile backer)
Use 1/4" sleeve anchors rated for 75+ lbs shear strength. For a banister stair gate, always mount higher anchors 2" above the gate's upper hinge point. This counters downward torque.

Regalo Extra Tall & Wide 2-in-1 Gate
Extra-tall, wide, durable gate for stairs and hallways.
$69.99
Fits Openings34"-55" wide, 35" tall
Fits Openings34"-55" wide, 35" tall
Pros
Secure for top-of-stairs with included banister/wall mount kit.
Steel construction withstands pushing, prevents climbing.
Walk-through door with one-hand operation.
Cons
Installation can be challenging; latching mechanism issues reported.
Plastic hinges may break over time with heavy use.
Customers find the baby gate sturdy with a strong metal construction and appreciate its effectiveness at the top of stairs, keeping children safe and preventing falls. However, the installation experience is mixed, with some finding it easy to install while others report difficulties. Moreover, the gate's security receives mixed feedback - while it's very secure when installed correctly, some report issues with the latching mechanism not staying put. Additionally, several customers report breakage issues, particularly with plastic hinges breaking and the bottom hinge snapping.
Customers find the baby gate sturdy with a strong metal construction and appreciate its effectiveness at the top of stairs, keeping children safe and preventing falls. However, the installation experience is mixed, with some finding it easy to install while others report difficulties. Moreover, the gate's security receives mixed feedback - while it's very secure when installed correctly, some report issues with the latching mechanism not staying put. Additionally, several customers report breakage issues, particularly with plastic hinges breaking and the bottom hinge snapping.
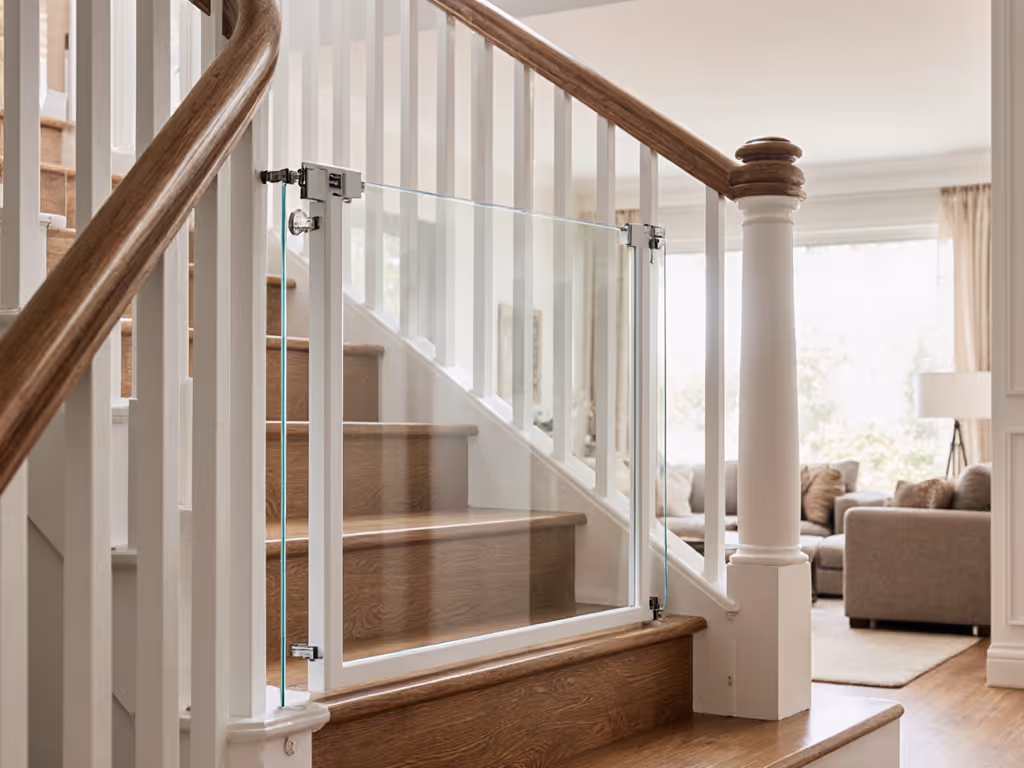
Banister Geometry Fixes for Non-Parallel Posts
Renters fear drilling into $10k banisters. Renter-friendly gate mounting starts with measuring actual post angles, not assuming 90 degrees. My client's turned newel post had a 7-degree cant, that wedge of daylight doomed stock kits. Here's your fix:
Step 1: Capture the True Angle
- Place a level against the banister
- Measure the gap between level and post at 6" height (e.g., 3/8")
- Calculate angle:
tan^-1(gap / 6")= 3.6 degrees
Step 2: Build Your Spacer Stack
For a 3.6-degree gap over 12" gate width:
| Height | Spacer Thickness | Material |
|---|---|---|
| Top | 1/2" | Poplar |
| Bottom | 1/4" | Birch |
Screw spacers to a backer board first, then zip-tie to banisters (no drilling!). This creates a level mounting plane. Regalo's square banister spacers (included in kits) only solve parallel posts, your custom stack handles real-world angles. For tricky angles and wide gaps, our gate extensions and adapters guide covers safe use of extensions, wall cups, and adapters.
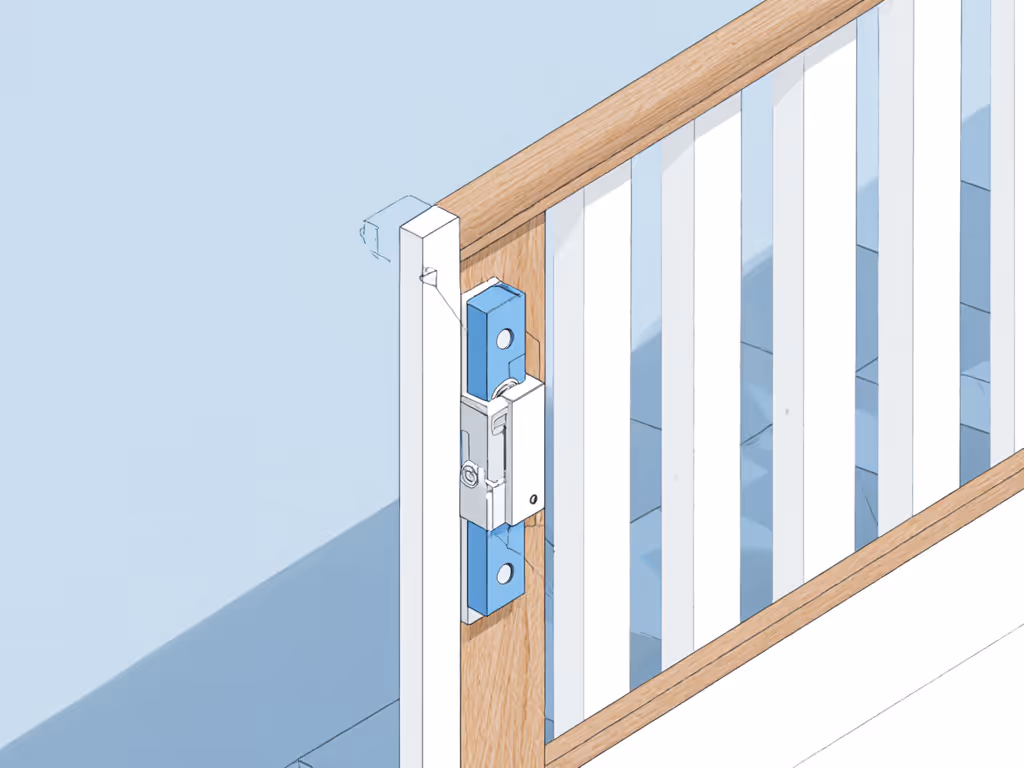
Step 3: Offset Hinge Clearance
If your spacer stack pushes the gate closer to the stair nosing:
- Add 1/4" plywood behind the hinge plate
- Shift plate 3/8" toward the landing
- Test swing clearance: Gate must clear nosing by 1.5" at full extension
Concrete Wall Mounting: Beyond Basic Anchors
Hollow-core concrete walls spell disaster for baby gates. Here's how to identify solid sections:
- Knock test: Solid concrete rings like a bell; hollow spots sound dull
- Stud finder with metal mode: Locate rebar/conduit (avoid within 2")
- Drill test hole: In inconspicuous spot (e.g., behind future hinge plate), check for debris flow
Critical: Never use plastic anchors in concrete. Instead:
- 1/4" x 2" Tapcon screws: Minimum 1-1/2" embed depth (3/4" into concrete)
- Wobble fix: Shim irregular surfaces with 0.060" steel washers
- Load distribution: Mount anchor at 30-degree angle toward gate swing direction
For irregular surface mounting solutions, pair this with a wall-mount gate featuring a 2"-deep bracket footprint, narrow brackets (under 1.5") tip easily on concrete.
Renter-Proof Tactics for All Surfaces
Your deposit depends on these steps: If drilling is off-limits, consider freestanding gates for rentals that avoid pressure or hardware mounts.
Pre-Installation Safeguards
- Blue tape mapping: Mark drill points with painter's tape (removable if you abandon drilling)
- Spacer padding: Line all contact points with felt (0.030" thickness)
- Screw sleeves: Drill into wall protector sleeves; leave sleeves in place for patching
Removal Protocol
- Unscrew gate but leave anchors in
- Fill sleeve holes with patching plaster
- Sand flush, then dab with matching paint pen
Pro tip: Take "before" photos of baseboards/banisters. Document pre-existing scratches to avoid deposit disputes.
Final Validation Checklist
Before committing, verify these physics-critical points:
- Swing clearance: Gate clears stair nosing by 1.5" at all swing points (measure in 15° increments)
- Upward torque test: Pull gate upward with 20 lbs force, no movement > 1/8"
- Lateral stability: Push gate sideways at top rail, deflection < 1/4"
If any test fails, rebuild your spacer stack. For ongoing maintenance, run monthly checks using our loose gate safety checks to fix wobble before it becomes dangerous. Measure the flow, then commit to the mount. Rushing here risks catastrophic failure at 3 AM when you're half-asleep carrying a toddler.
Your Action Plan for Flawless Installation
Tomorrow, grab your caliper and level. Map your staircase's reveals, plumb errors, and baseboard lips (not what the gate manual assumes). Photograph problem zones. Calculate custom spacer thicknesses before buying hardware. For banisters, build that backer board spacer stack and dry-fit with zip ties. Concrete walls? Locate solid sections with the knock test. Tile floors? Drill using the tape-and-core-bit method. When you've validated clearance and stability, then drill. Map, dry-fit, then drill. Your child's safety (and your landlord's goodwill) depend on this discipline. Start measuring tonight; install calm, confident, and crack-free by sunset.
Related Articles