Baby Gates for Tile Kitchens: Moisture-Resistant Narrow Solutions
By Nia Okoye • 21st Oct
When your kitchen flows into dining and living spaces, a common layout in modern homes, finding the baby gate that truly works for your tile floors becomes critical. Traditional gates often fail where water splashes, feet slip, and appliances hum: your kitchen. The right kitchen safety gate solutions don't just block access; they integrate seamlessly with your daily flow while resisting moisture damage. As someone who's helped hundreds of families create safe, functional spaces (from rental apartments to multilevel homes), I've learned that the simplest solutions often prevent the most accidents. Let's walk through how to choose and install a gate that works with your kitchen's unique challenges, not against them.
Understand Your Kitchen's Unique Gate Challenges
Tile kitchens present specific hurdles that standard baby gates can't handle:
- Moisture exposure from spills, cooking steam, and cleaning
- Slippery surfaces where baseboards meet tile
- Narrow pathways between counters and islands
- Appliance proximity requiring careful swing clearance
- Pet traffic needing different access than toddlers
Before measuring or shopping, complete this quick assessment:
Pause for 60 seconds: Walk your kitchen route while carrying a basket (simulating baby-on-hip movement). Notice where you stumble, reach awkwardly, or need two hands. This reveals your true gate placement needs better than any tape measure.
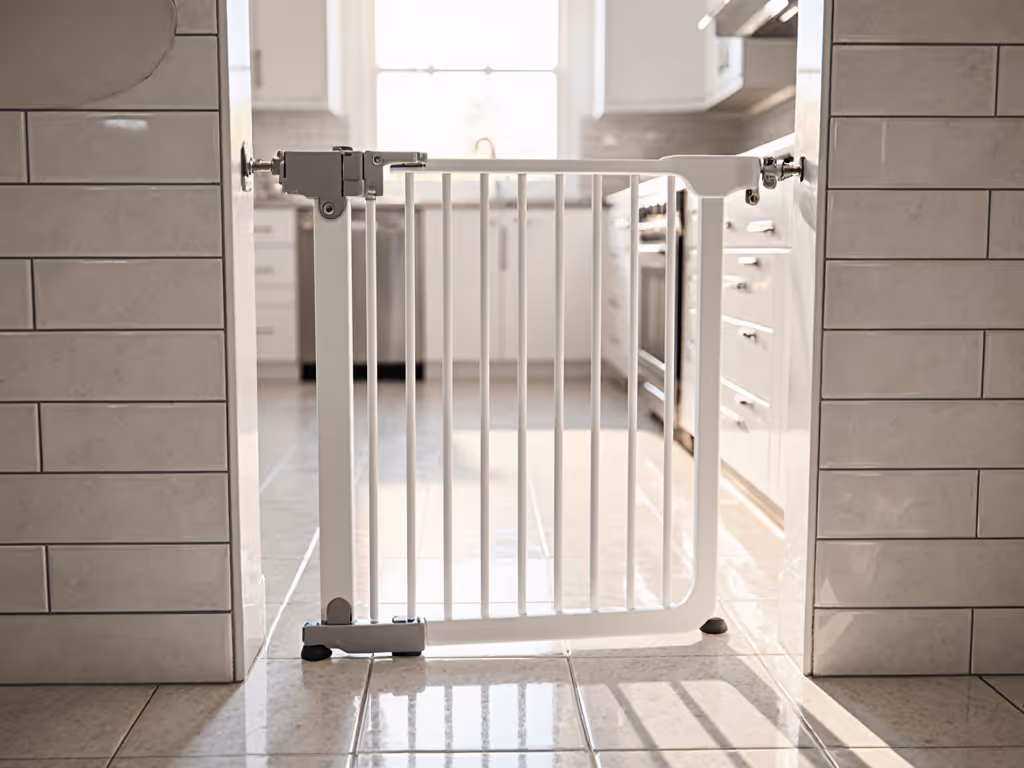
Step 1: Match Gate Type to Your Tile Reality
Not all gates survive kitchen conditions. Select based on your moisture exposure level:
Low Exposure Areas (near dry counters, away from sink):
- Pressure-mounted gates with stainless steel hardware
- Powder-coated metal frames (avoid painted finishes that chip)
- Bamboo or sealed wood options with moisture-resistant coatings
High Exposure Zones (near sink, dishwasher, cooking areas):
- Moisture-resistant gate materials like marine-grade polymer or anodized aluminum
- Gate feet with rubberized, non-slip pads (not felt which absorbs moisture)
- Hardware-mounted installations to prevent shifting on smooth tile
Make the safe action the easy one: If your gate requires constant adjustment due to slipping on tile, you'll stop using it. Invest in the right mounting type upfront.
Step 2: Measure for Narrow Kitchen Passages
Kitchen hallways often measure 22 to 28 inches, which is too narrow for standard gates. Follow this measurement protocol:
- Measure at three heights: baseboard level, knee height, and handle height
- Account for baseboard thickness (common on tile floors)
- Check for uneven surfaces where tile meets other flooring
- Factor in appliance swing clearance (refrigerator doors, oven handles)
For spaces under 28 inches: See our guide to gate extensions and adapters to safely bridge tight or uneven openings.
- Look for narrow hallway gate options with custom sizing
- Choose swing direction that opens away from high-traffic zones (e.g., toward cabinets not the sink)
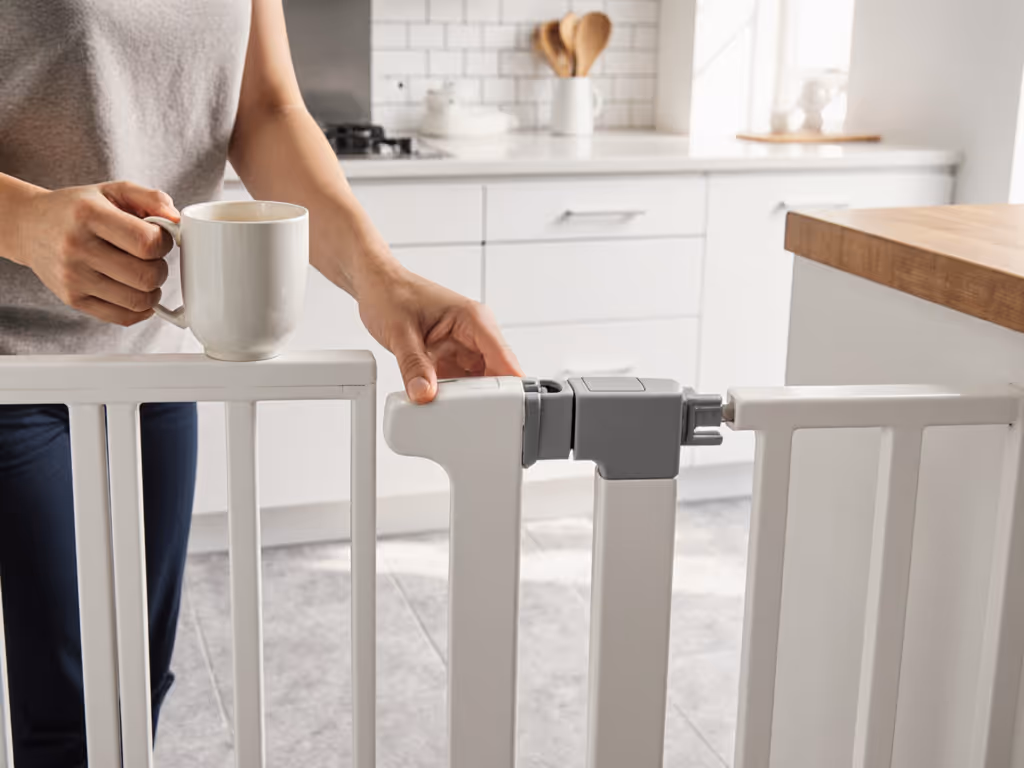
- Ensure latch height accommodates your dominant hand while holding baby
The solution Grandma and I landed on? Mounting the handle on her dominant side and setting the gate away from step-downs. Practice one-handed closes during snack time. Within a week, safety became automatic.
Step 3: Install for Kitchen Durability (No Rental Damage)
Tile installations require special consideration to prevent slipping and wall damage: Renters can compare pressure vs hardware mounting before choosing an approach for tile.
For Renters & Homeowners Averse to Drilling:
- Use spacers between gate and tile to prevent slippage
- Apply self-adhesive rubber pads under mounting brackets
- Choose pressure gates with adjustable tension that compensate for smooth surfaces
For Permanent Installations:
- Use stainless steel screws (not regular steel which can rust from moisture)
- Apply silicone sealant around screw holes to prevent water seepage
- Install wall protectors behind hinges to distribute pressure
Pro Tip: Test your gate's stability by pushing at diagonal corners. Kitchen gates must withstand sideways force from curious toddlers leaning while exploring appliances.
Step 4: Integrate with Your Appliance Safety Zones
Your gate isn't just a barrier, it is part of your appliance safety system:
- Position gate far enough from stove to prevent grabbing hot handles through bars
- Ensure microwave and dishwasher are secured with separate locks (don't rely solely on gate)
- Create a triangle: gate placement, safe play zone, and your normal cooking position
For wet environment gate installation, follow this boundary protocol:
- Gate must sit at least 18" from sink edge
- Base must clear dishwasher steam vents
- Swing direction must avoid refrigerator condensation drips
Step 5: Make It Work for Everyone (Including Pets)
Kitchen gates often serve dual purposes: keeping toddlers from hazards while allowing pets access to feeding stations. For broader planning, see our pet-home gate guide for tips on feeding zones, litter privacy, and pet door integration. Address this with:
- Two-tier latching systems (one height for baby, lower access for cats)
- Visual cue stickers indicating proper closing technique for grandparents
- Basket placement to prevent propping during meal prep
Remember: The most secure gate fails when caregivers can't operate it smoothly. Make safety automatic through smart design that accommodates mobility limits and differing heights.
Step 6: Build Low-Friction Gate Habits
The right gate only works when used consistently. Transform gate operation into muscle memory:
- Anchor the habit to existing routines: "When I put coffee on, I check the gate latch"
- Practice one-handed closes while holding something in your other hand If you prefer a self-latching option, review our auto-close gate reliability.
- Add a visual cue near the gate (a small colored dot at eye level)
- Place a reminder basket where people might prop the gate open
Low-friction habits prevent more mishaps than complicated gear or rules. Make safety the default, not the exception, every day.
Final Checklist Before You Install
Before committing to your gate choice, verify these kitchen-specific requirements:
- Gate feet won't slip on wet tile (rubberized, not felt pads)
- Swing direction avoids appliance handles and hot surfaces
- Height prevents climbing (at least 30" tall for kitchen zones)
- Latch operates smoothly with one hand while holding items
- Materials resist moisture damage (no untreated wood or rust-prone metals)
- Installation method respects your tile and rental agreement
- Visual cues help all caregivers use it correctly
Your kitchen gate shouldn't feel like a compromise between safety and function; it should enhance both. When you find that perfect integration point where security meets simplicity, you'll notice the difference immediately: less hovering, more confidence, and genuine peace of mind while cooking, cleaning, or simply enjoying your home.
Make the safe action the easy one. That's the foundation of accident prevention in any home.
Your Actionable Next Step
This week, conduct a "kitchen gate test" during your normal routine: prepare a meal while carrying something in one hand. Note where you struggle with access or balance. Then, measure those problem zones using the three-height method described above. With these real-world measurements in hand, you'll eliminate guesswork and find a solution that works with your actual life, not just theoretical safety standards. Share your measurement findings with family caregivers to ensure everyone understands why this specific placement matters for your home's safety flow.
Related Articles